In this example, we are going to be using Nagios Core installed on a CentOS Stream 9 system, but you could use any system of your choosing, although installation of the Nagios Core package and locations may be different. If you’d like to install it from source on any system, read the Nagios Source Installation Guide. In this guide, we are going to install the packaged version.
Since Nagios Core is an EPEL package, all we need to first install the EPEL release package:
sudo dnf install epel-release -y
Then, we can install Nagios Core by simply running:
sudo dnf install nagios -y
You can verify Nagios Core was installed correctly by running:
systemctl status nagios
We need to make sure that the apache user is added to the Nagios user group to ensure that NRDP will work correctly.
sudo usermod -a -G nagios apache
We will need to make a config directory for ReChecked Manager’s Nagios Core objects config files. Run the following code to create a new config directory:
sudo mkdir /etc/nagios/rcmanager
We will need to edit the Nagios Core config file in /etc/nagios.cfg file (using nano or vim) and add a cfg_dir which we will use later for configuration files for ReChecked Manager. Add the line below to your nagios config file.
cfg_dir=/etc/nagios/rcmanager
Save the file with the line added.
Nagios Core is installed now, you will also have installed Apache, the web service, that will be required to view the interface. You will need to start both Nagios Core and Apache to see the interface. Run:
sudo systemctl start nagios
sudo systemctl start httpd
You will need to enable the Nagios Core and Apache systemd service as well so it will start when your system reboots, running:
sudo systemctl enable nagios
sudo systemctl enable httpd
You will also need to open your firewall for HTTP traffic on port 80 if you have not already:
firewall-cmd --zone=public --add-port=80/tcp
firewall-cmd --zone=public --add-port=80/tcp --permanent
Now that Nagios Core is running and installed, you can view the web frontend from going to http://<ip address>/nagios, default credentials are nagiosadmin for both username and password. You should see the following screen:

Now that Nagios Core is installed and running, we need to install NRDP, which will be the API used to submit passive checks from the rcagents that are installed.
You can now test out NRDP by going to http://<ip address>/nrdp and you should see the following interface:

Type in the token you set above, and press Submit JSON Check Result. This will send the test check in the text input box to NRDP and you should see a message at the top that says OK if the message was valid and the results were written for Nagios Core to read from the check results directory.
Now that NRDP is working, we can move on to setting up ReChecked Manager.
Before we start creating checks and applying those to the agents, we will need somewhere to send those checks. We set up Nagios Core and NRDP so that we can create a new Nagios Instance in ReChecked Manager. Go to the Manage Nagios Instances page and click on Add Nagios Instance.

Enter in an Instance Name, and select Nagios Core for the Monitoring Engine. Input the NRDP URL and NRDP Token that was created during NRDP install. You can leave the Core Config File Settings blank, the setting allows you to specify a specific host/service template to use for the checks that are configured for this instance. However, if you leave them blank you will use the default ReChecked Manager templates, which will not add any contacts to your hosts and services.
For this example, we already have 3 agents added to the organization. We have created 2 groups to mirror the configuration above. One group is Location 1 and another group is Location 2. Here’s the created groups in ReChecked Manager:

In your organization, you can create as many groups as you want, but in this example we will use these 2 groups to deploy specific configurations to the agents in each group.
We will create a configuration for both Location 1 and Location 2. Start by going to the Check Configurations, click on Create Config. For this example we will be using the config name Location 1 – Basic Checks and Location 2 – Extended Checks.
For the first configuration, Location 1 – Basic Checks, set the config name and set the Apply Config To select to Agent Group this will allow you to select the Location 1 group to apply these configurations to. Select the Nagios Core instance we created in the prior step. Your config should look like this:

Now we can add our first host and service checks. We can use the special hostname $LOCAL_HOSTNAME for the configuration to use the hostname of the system the rcagent is running on. This allows us to get the system status of each agent’s host with a single host check configuration. Let’s create a host check with some basic services with the $LOCAL_HOSTNAME as the hostname.

We are using a system/version endpoint check. This will just return the agent’s current version with an OK status. This means the host in Nagios Core will turn CRITICAL if it is offline or the agent is not running. Click Add Check to save the host.
As you can see there are currently 0 service checks created for this host.

Just for this example, we are only going to make one service check, just a simple CPU Usage check. Set the service name to CPU Usage, and add a warning and critical value. In this example we are using 70 and 90 percent utilization thresholds.

Click Add Check and to add it to the host. You will see the check appear in the service checks list. Once you’re done adding checks here you, click Close.

Now you can see that there is service checks created for this host. Click Save Config at the bottom of the page. You can see the configuration in the Check Configurations list.
Now you can complete the same process for Location 2 – Extended Checks. Feel free to add a couple more checks this time. You can even add more hosts. You can set a host address during host creation and use the variable $HOST_ADDRESS in the service configurations. This allows you use your agent as a hub to connect to other hosts to run plugins, such as check_by_ssh, in order to offload checks from your Nagios Core system.
Make sure to apply the new configuration to Location 2 this time. Your Check Configurations list will look like this once you’ve finished adding the second configuration:

Configuration is now completed. We can move on to learn how to manage checks using ReChecked and Nagios Core. We will need to update Nagios Core configurations, but don’t worry, it’s just a simple download!
Working with ReChecked creates additional tasks when making configuration changes due to using passive rather than active checks. With the configuration changes made, your agents will sync and update their configurations. You can watch for your agent sync to finish on the agents page. However, you will also need to update your Nagios Core configurations if you have added new checks. Now you can verify the check results are coming in from the Nagios Core interface.
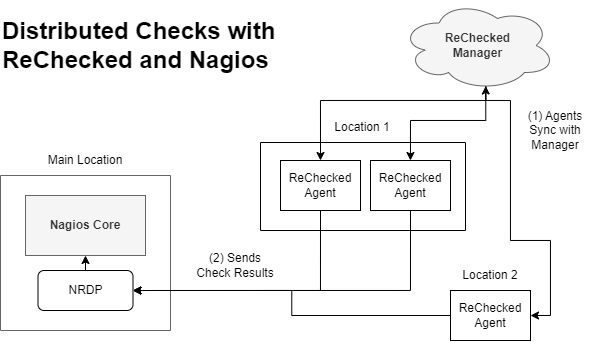
Below is the workflow for managing checks when using ReChecked:

Agents will automatically sync when check configurations are changed. If you’ve made a recent change and opened the Agents page, you may see a screen like this:

As you can see, there is a  icon which is used to indicate that an agent has changes waiting to be synced. Normally syncing takes less than a minute. Once the sync is finished, new checks will start running on the agent.
Changes to check configurations require you to re-download the Nagios Core Config Files. Place the downloaded config files in the configuration directory (in this example, it’s /etc/nagios/objects) and restart Nagios Core. To do this, go to the Manage Nagios Instances page in ReChecked Manager. You should see the following from earlier:

Download your config files by selecting  which will download a zip file with all the Nagios Core configs required to handle the checks you have configured.
On the Nagios Core system, unzip the file, clear out the old contents of the objects directory, and then move the contents to /etc/nagios/objects or wherever your Nagios Core configuration directory is located.
unzip instance_nagios_core.zip
sudo rm -rf /etc/nagios/rcmanager
sudo mv rcmanager /etc/nagios
Configurations for each host are in the rcmanager folder. Each host has is a separate file. Service configurations are inside the host file. If you did not specify a template name, you’ll also see a file with the default passive check templates.
Apply the new configuration files in Nagios Core you will need to restart it:
sudo systemctl restart nagios
Now we can verify that the changes were made in the Nagios Core interface and verify we are receiving check results.
We can easily verify check results are coming in from the Nagios Core interface. You should see something like the following if you’ve been following along with the examples above:
 You’ll see the following for service checks:
